Module 5: Advanced testing techniques
Advanced testing techniques
Selenium grid Setup
Selenium grid setup in katalon studio
To leverage even more on parallel testing you can consider using a selenium grid setup for katalon studio. At the moment Katalon only support Selenium grid 3 but…
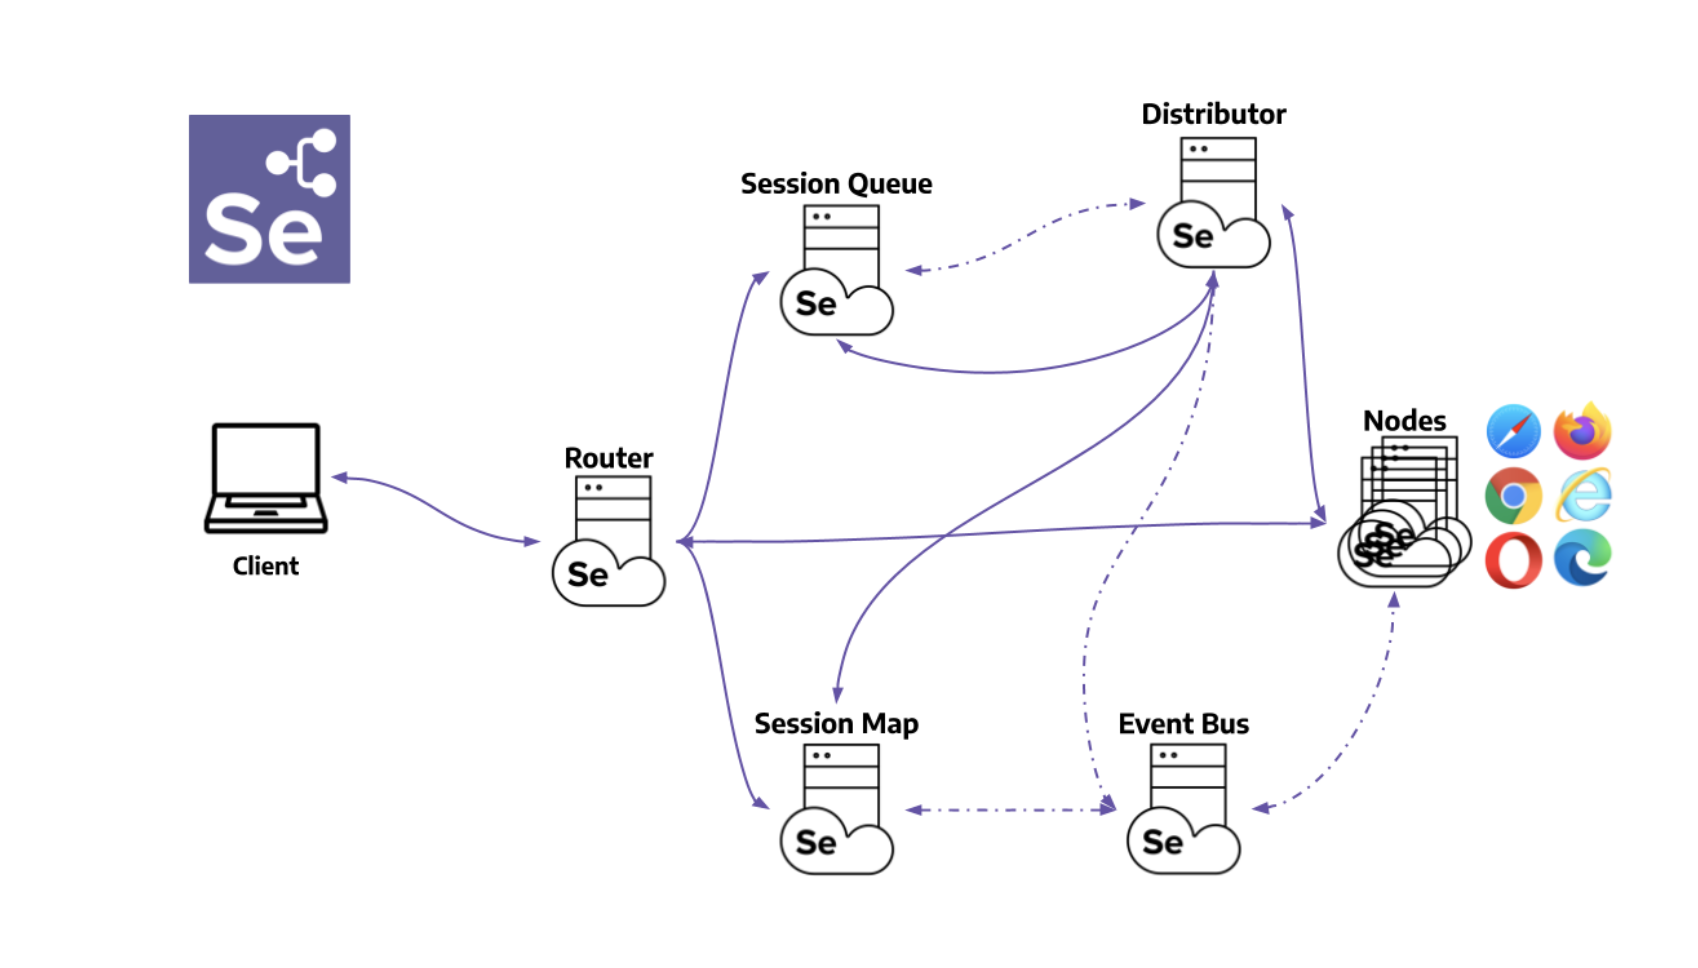
Running Selenium 3 tests on a Selenium 4 Grid is feasible and is designed to be backward compatible to ensure that tests written using the Selenium 3 API can still execute on the newer Selenium Grid version without requiring immediate code changes. However, to take full advantage of the new features and improvements in Selenium 4, it is recommended to eventually update your tests to Selenium 4. Here’s how you can run your Selenium 3 tests on a Selenium 4 Grid:
Setting up a Selenium Grid on Kubernetes or AWS Fargate provides a scalable and flexible infrastructure for parallel testing, allowing you to execute multiple Selenium tests across different browsers and operating systems simultaneously. This setup is beneficial for speeding up the execution of a large test suite and ensuring your application works correctly across different environments. Below are general guides for setting up Selenium Grid on Kubernetes and AWS Fargate.
Setting up Selenium Grid on Kubernetes
Kubernetes, an open-source platform for managing containerized workloads and services, is well-suited for running Selenium Grid in a scalable and resilient manner.
Prerequisites
- A Kubernetes cluster set up and accessible. You can use managed services like Google Kubernetes Engine (GKE), Amazon EKS, or Azure AKS.
- kubectl command-line tool installed and configured to communicate with your cluster.
- Basic knowledge of Kubernetes concepts (Pods, Deployments, Services). Steps
- Create a Selenium Grid Deployment:
- Use the official Selenium images (selenium/hub, selenium/node-chrome, selenium/node-firefox) for the hub and nodes.
- Define a Kubernetes deployment for the Selenium hub and each type of Selenium node you need.
- Expose the Selenium Hub:
- Create a Kubernetes service to expose the Selenium hub to your tests. You might use a LoadBalancer service type for external access or a ClusterIP if you plan to run tests from within the cluster.
- Scale Selenium Nodes:
- Adjust the number of replicas for each node type according to your parallel testing needs.
- Run Tests:
- Configure your test framework to connect to the Selenium hub using the service’s IP address or DNS name.
Setting up Selenium Grid on AWS Fargate
AWS Fargate is a serverless compute engine for containers that works with Amazon Elastic Container Service (ECS), allowing you to run containers without managing servers or clusters.
Prerequisites
- An AWS account and familiarity with AWS services.
- The AWS CLI installed and configured. Steps
- Create an ECS Cluster:
- Opt for the Fargate launch type when creating your cluster.
- Define Task Definitions:
- Create ECS task definitions for the Selenium hub and node containers, specifying the use of the official Selenium Docker images.
- Run the Selenium Hub and Nodes as Services:
- Create ECS services for the Selenium hub and each node type, referencing their respective task definitions. Make sure to set the network mode to awsvpc for direct networking capabilities.
- Expose the Selenium Hub:
- Use an Application Load Balancer (ALB) to expose the Selenium hub service externally. Configure the listener and target group to forward requests to the hub.
- Scale Selenium Nodes:
- Adjust the desired number of tasks for each node service according to your testing requirements.
- Run Tests:
- Point your test executions to the ALB DNS name to connect to the Selenium Grid.
General Tips
- Monitoring and Logging: Utilize Kubernetes and AWS monitoring and logging tools to keep track of the Selenium Grid’s performance and troubleshoot issues.
- Security: Ensure your Selenium Grid is secure, especially if exposed externally. Consider using network policies in Kubernetes and security groups in AWS to restrict access.
- Version Compatibility: While setting up, ensure that the Selenium Grid version and the node versions are compatible with your test suite and browsers. If you need support on selenium grid, this is off topic please contact me, I have various kubernetes and aws fargate examples of the shelve to easily integrate in your private cloud landscape (Azure, Google cloud, AWS)
If you want to try it out locally use a docker compose file from the selenium github to get it up and running
Docker Compose File for Selenium Grid
Create a docker-compose.yml file in your project directory and add the following content:
version: '3'
services:
 selenium-hub:
 image: selenium/hub:4.1.1-20211217
 container_name: selenium-hub
 ports:
 - "4444:4444"

 chrome-node:
 image: selenium/node-chrome:4.1.1-20211217
 container_name: chrome-node
 depends_on:
 - selenium-hub
 environment:
 - SE_EVENT_BUS_HOST=selenium-hub
 - SE_EVENT_BUS_PUBLISH_PORT=4442
 - SE_EVENT_BUS_SUBSCRIBE_PORT=4443
 volumes:
 - /dev/shm:/dev/shm

 firefox-node:
 image: selenium/node-firefox:4.1.1-20211217
 container_name: firefox-node
 depends_on:
 - selenium-hub
 environment:
 - SE_EVENT_BUS_HOST=selenium-hub
 - SE_EVENT_BUS_PUBLISH_PORT=4442
 - SE_EVENT_BUS_SUBSCRIBE_PORT=4443
 volumes:
 - /dev/shm:/dev/shm
Start Selenium Grid: Navigate to the directory containing your docker-compose.yml file. Run the following command to start all the services
docker-compose up -d
- Accessing the Selenium Grid Console: Once the containers are up and running, you can access the Selenium Grid console by navigating to http://localhost:4444 in your web browser. Here, you can see your Grid’s status and connected nodes.
- Running Tests: Now, you can run your Selenium tests against the Grid. Configure your test to use the remote WebDriver pointing to http://localhost:4444/wd/hub.
- Scaling Nodes: If you need more Chrome or Firefox nodes, you can scale them using Docker Compose. For example, to scale to 3 Chrome nodes, run:
- Stopping Selenium Grid: To stop and remove the containers, networks, and volumes created by docker-compose up, run:
docker-compose down
Customization
- Selenium Version: You can change the version of Selenium in the image tags (e.g., selenium/hub:4.1.1-20211217) to the desired version that supports your test suite.
- Browser Versions: Similarly, adjust the browser versions by selecting different tags for selenium/node-chrome and selenium/node-firefox images according to your testing requirements.
- Additional Nodes: To add more browser nodes (e.g., Edge, Opera), replicate the service definitions for chrome-node or firefox-node and adjust the image used. I